But.... I wasn't sure how high I could stack the bowls from the top of the kiln, so I made this video in hopes some of my friends would help me with the decision to either fire it that way, or to take some out.
So hoping this firing goes well. Since it looks like a few bowls could still be wet, I decided to leave the bowls in the kiln for a few days until I know for sure they are dry, unless.... I do a candling on them like a potter friend recommended.
Just thought you might enjoy seeing the video, so here it is!

Monday, September 26, 2011
Friday, September 16, 2011
My Newest Video
This video shows what the bowl looked like with glaze on, before I fired it, and then after it was fired, with the exception of one bowl I threw in the mix which was greenware.
So I've been at this for 3 months now. I think I've improved greatly. This was my second glaze firing. Stay tuned for more and .... Thanks yall for stopping by!
So I've been at this for 3 months now. I think I've improved greatly. This was my second glaze firing. Stay tuned for more and .... Thanks yall for stopping by!
I surprised myself, making this
I thought I'd post a picture of something I made. My sister was at my house the other day. She said, "Hey, if you ever learn to make one of those sugar and creamer sets you put on your table, I'd like to have one". I laughed at her and said, "Well, maybe someday when I am good enough, I have not seen a video on making those to be able to do them". But, tonight as I was at the wheel, I was thinking about it... thinking about what size I would make. I had about 1 1/2 pds of clay on the wheel at the time, turning it into a cylinder and I thought "hey, maybe I could make a sugar dish... who knows"? And ... so I did.
And here is what it looked like....

I somehow managed to make the shape in the mouth of the jar for a lid and I thought, "Now how in the world will I made a lid"? I have no calipers yet either as the ceramic supplier was out of them.

So, I grabbed a lump of clay and started with a lid.

I was so amazed I did that! I used one of my quilting rulers to measure the mouth of the jar for the lid, and then measured the lid too. I ended up trimming the lid once it was leather hard and I could try it on the jar because it was a little too wide for the lip of the jar. I was so tickled! I surprised myself with this one.
Then... I had the thought to make the little milk jar... and so I got busy throwing a cylinder again.. and here is the milk jar.

Here is a better pic of the lip of the milk jar.

It may not be the most pretty, but to me it's pretty cause it's my own creation! This is what I am looking forward to... doing my own thing with clay!
I'll update later today.. I have to get the pics of what it looked like when I got finished. I added a handle to the milk jar and then took my clay extruder and made some dainty swirly lines around the jars. Looked sort of Victorian if you ask me!
Thanks so much for subscribing, if you have... and if not, please do. If not... thanks yall for stopping by to read my updates!
Thursday, September 15, 2011
Kiln Test Complete and Working!
Thought I'd give an update. According to the Skutt manufacturer the other day, he had Chris do some various test on the kiln and we found out the elements were good but the relays were not. So we went and bought 3 new ones. Test fired it last night and I took notes at each segment. The temps exceeded the required amounts each time by only a few degrees. Started at 5:15 and the kiln had reached it's 04 cone temp by 12:27 at 1947 degrees and shut off.
The kiln was not cool enough to lift the lid until around 8pm tonight. It took quite a while for it to cool down, so when it got to around 140 degrees I opened the lid. Of course if there was ware in there, I wouldn't have opened it.
So I went out with my video camera and did a video of the cones in the kiln to see if they coned out at 04 temps and sure enough they did.


And here is the cone on the bottom shelf


The kiln was not cool enough to lift the lid until around 8pm tonight. It took quite a while for it to cool down, so when it got to around 140 degrees I opened the lid. Of course if there was ware in there, I wouldn't have opened it.
So I went out with my video camera and did a video of the cones in the kiln to see if they coned out at 04 temps and sure enough they did.
Here is the cone on the top shelf

Here is the cone from the middle shelf... and OOPS... I forgot to kiln wash this piece of furniture!
Lesson learned... "don't put anything on top of the furniture unless it's kiln washed first. Well Duh!

And here is the cone on the bottom shelf

And here is all 3 of the cones together

For those of you who know anything about testing a kiln, you know you start with one cone lower than the temp you are firing to, and one cone higher. So if you are doing a bisque 04 firing, you would put in a cone 03 for the guide cone which tells you to watch for the firing cone (04) to bend and a 05 cone to make sure it doesn't over fire. Well, my supplier says Ort is in the business of selling cones and really all I needed to do was to put in 3 04 cones to test the temps in the top, middle and bottoms sections of the kiln. I do believe my kiln has passed for the 04 test. From what I am told, it should be at least in 2:00 position. I'm still not absolutely positive on the middle on which is bent over... because it's mounted on the furniture. This tells me that it could have been a blob on my kiln shelf, which of course wouldn't have stuck since there is kiln wash on the shelf. But... the cone could have been in an overly melted stage. I'll test again, but next time it's going to be with the kiln loaded.. and I'm sure things will be just a little different in there.
Thanks for stopping by to see the results of my kiln.
I'll have a video of this as well, shortly on my YouTube channel.
In case you don't have that address it's Muditsallabout
Monday, September 12, 2011
Kiln Test Complete
Really disappointed as I type this, this morning. The kiln fired until 12:00 midnight last night and it only reached the temperature of 1248 degrees and should have been at 1946 degrees. The witness cones in the kiln were still standing straight up and had not bent any either. So this tells us that either there is a problem with the thermocouple or some or all of the elements are bad :( Either way, we will call Skutt today and let them help us diagnose the problem. Elements can be expensive, but... not as expensive as a new kiln. One way or another, we will get it fixed. I'm not going to worry over it, but I'm just anxious to get my own going so I can experiment with some slips and my own home grown clay.
I saved this to my drafts folder so I didn't have to make another post for today. We called the Skutt Manufacturer today and talked to them. I'm so blessed my husband is so smart! He was able to do exactly what the tech told him to do in order to test the elements and the relays. Come to find out, I have at least 2 relays which are bad. It was suggested that we go ahead and replace all 3. We will be calling the local ceramic shop tomorrow to see if the guy carries the relays there. If they are too expensive there, we'll just order from Skutt.
I will be so happy when we get this all worked out! I'd love to get myself a gas kiln next since I really got into this to make some Crystalline Vases! Stay tuned... I'll be posting some pics of the bowls I got out of the kiln. This is my second batch of bowls. They turned out pretty good, but they look to be underfired. Wait till you see the watermelon bowl... gosh it turned out great enough to eat! lol.
Thanks for stopping by to read my blog. Now, more tomorrow!
Sunday, September 11, 2011
My first kiln and first test
Wow, I can't believe it's been 5 days already since I last posted. I've been pretty busy trying to throw some bowls for the Empty Bowls project and I just finished doing some glazing on some bowls. I should be getting those back tomorrow. I am having those fired through "The Arts Council" here in town. I am in high hopes those bowls turned out. I did some really pretty designs on at least 2 of them. Anxious to see if they turned out.
I didn't mention I bought a kiln about a month ago but yes, I did. I paid 450.00 for it. I bought it "As Is". I never seen it run but I know the furniture which came with it is so worth 450.00 I couldn't go wrong and the inside of the kiln looks brand new. Last night I sanded the shelves off lightly and applied some kiln wash to them. This protects the shelves in case any glazes run over on to them. Today I placed the shelves in the kiln and I also put a "Witness Cone" on each level of my kiln. I'm supposed to be testing them to see if the kiln is actually firing to the program I selected which is a 04 bisque. Well, those are the cones I used. I realized later I should have bought one cooler than what I was firing to, and one hotter. Oh well.... at least with 4 of these 04 cones I will at least know if the kilns heat is equally distributed around the whole kiln.
I'm anxious! We started the kiln at 4:15 this afternoon and it won't be finished until 11:00 tonight. I am just anxious to see if the kiln works properly. If so, I have a gold mine! I didn't put any of my ware in the kiln. I wanted to test it without anything being in there. This way I don't have to worry about my pieces being under fired or over fired in case something goes wrong.
Ok, I'll post again tomorrow or the early hours of the morning and let you know how it went. Oh, I made a video showing what my kiln looks like. It's on YouTube. I'll post the link later or you should be able to view it on my video bar once it comes up. My username there is Muditsallabout. That is because someone had already taken my name Muditis. I have Muditis registered though already as my domain, so I will eventually have the website up!
Thanks so much for subscribing or stopping by! By the way, I love comments :)
Tuesday, September 6, 2011
Finally got my first glaze pieces on video
When I started this blog and my YouTube Channel I never realized how much work this was going to be. I finished putting the glaze result pics in the presentation on Monday, and then on Tuesday, I spent alot of time on YouTube searching how to take an OpenOffice Impress presentation and turn it into a video. Of course everyone wanted to sell me a program to do this. I was so frustrated by the end of the day. One piece of software was found to have a virus in it. I wasn't surprised at all, considering I don't normally download files from anyone except tucows.com or download.com. By the evening I found ONE YouTuber which was telling some basic things on saving files in PowerPoint to be able to use in Windows Movie Maker. Surprisingly, I was able to finally catch on. I'll spare all the details unless you need to know too. Then I'll be happy to make a post with the directions in it. So then once I got my files into Movie Maker, I added the music. Then I found out that the music ran out. Oh gosh... now I needed to know how to edit the sound file. I looked on the net for a free music editor and found one. I didn't spend so much time on that and you can hear the clip where I added it, but that's ok.. my brain is burned out!
So now I've got my blog up, A presentation video uploaded to YouTube and now I just need to work on one more thing.. "My databases".. showing what colors of glazes I use on my pottery so I can see the results. I'll get better at this as I go along. This took alot of my time though and I haven't thrown in a few days. I miss it so much, but this is the only way sometimes I can get done what I have to get done.
In case you haven't seen my latest video, here is the link! Click the full screen to see in HD format!
In the Beginning of Muditis
I know my ceramics look like a kindergarten, but that's ok, we all have to start somewhere. At least I have a record now and I can look back and see how far I have come. Hope you enjoy the video, and thanks for stopping by!
Monday, September 5, 2011
Welcome- and how I got started in Pottery
Hello, and welcome to my newest blog and my newest hobby! For those of you who know me well, you know I'm always getting into something. This is what seems to keep me happy though, keeping my mind and hands occupied, and just staying busy. Sure beats worrying about general things in life.
Well, I suppose I should explain how this hobby came about. So here goes....
When I was about 10-12 years of age, my dad owned some land down the road from where we lived. He used to plant corn there for the horses. He also owned what we call today, a clay pit. In that clay pit was a place we would go swimming. It seemed to have a natural spring somewhere as the water stayed in there and was always so nice and clear, unless of course we were swimming and kicking up the bottom. We had such a good time at that swimming hole.
Not only did we swim there, but the land extended into I don't know how much acreage but we would walk around there when we could and look for arrowheads and flint in the fields. While we looked for those items, we'd always come across pieces of pottery laying around. I always wondered why it was a reddish color but black on the other side. My uncle owned a field there as well. There was also a really nice fish pond another uncle owned back then too. So back then, we'd hunt those fields and that dirt road to see what we could find. I was always looking for treasure :)
I guess one day I took the notion to dig in the dirt in the clay pit there to see just what I could find. As I dug I was amazed to see the layer of gray looking clay inside. I began to think to myself, "Uh huh... so that's how those Indians made that pottery, right from this clay here". So that is when I began wondering how it was done. I never pursued the dream back then of finding out. No-one around to really influence me I guess, or to ask questions, so it never came up again back then.
I guess I never gave pottery too much thought until around 9/2010 when we were in Gatlinburg, TN and I turned on the visitor channel there at the Condo. It showed a bunch of crafters and the Arts Community there and oh my... there was Alewine Pottery on there showing their pottery. I think I watched that channel for the next 3 hours. I enjoyed their advertisement so much, the bluegrass music and all. (by the way, I'm a guitar player too, although I haven't done it in a while) I was so thrilled as I watched. I told my husband then, "I really want to learn how this is done, I've wanted to know since I was a little girl, and look how old I am now". Well, he thought it was a great idea to go to the Arts Community to check them out. I immediately told him, "Ok, we can go, but you go in there and see if they really are what they say, check out their pottery and see if it really looks like that, and tell me if someone is playing the banjo". And so we went... and so I sat there in the vehicle while he went in. When he came back, he said, "Yes, they are everything they say they are in the advertisement, don't you want to come in"? I just simply smiled and said, "Na... I better not, cause I know I don't have the money to spend in there, and I have already seen how beautiful their pottery is, I can't afford a piece. So, we left. He kept telling me how beautiful the pieces were and how many other potter's were in there working as well. What a wonderful place it seemed to be and I knew one day I'd be back, and with some money!
Well, I guess that was long, huh? I'm not finished though, lol
My next encounter came in March of this year (2010 in case I look back someday on this post) when I was at a friends surprise baby shower. There was another homeschool mom present there. I knew JoAnna from the other mom's but also knew she worked at the Arts Council in town and for years she had taught clay classes. I had never taken a class. So I briefly spoke to her at the shower and told her I'd give her a call. Well, we touched base on Facebook and she sent me an invite to an Empty Bowls Class she was giving. I immediately was so excited. I signed up for the class and went. She taught us how to make a bowl with our hands, called "Pinch Pots". That is the first time I had ever touched the clay. It felt so soft, and so unlike I could have imagined in my mind. My first thoughts were, "Why is it grey"? "Why isn't it Red"? I guess I was thinking back about the red clay in the pit at home, but then I remembered the grey clay as well I had seen. I never asked her about it, at least I don't remember asking her.
I made the ugliest bowl you would ever see in your life. That poor bowl! I was still doing alot of quilting at the time, so when it came my time to decorate my bowl (you quilters will get a laugh out of this) I did some quilting lines like you'd do if you were quilting a quilt block. The really bad problem with this is, I went through the clay with my sharp pic and put holes in it. Now how in the world was anyone going to eat out of that bowl? Well luckily this class was for us to make 2 bowls. One for us, and one to donate to Empty Bowls. (You can read about The Empty Bowls Project here)
My next bowl was better, at least the walls of the bowl weren't so thin. The edges were not so smooth either, so how was someone going to eat out of my bowl? Well, I paid Joanna 10.00 for the bowl so I could personally eat out of it on Empty Bowls Night so I thought that would take care of that.
I think I was addicted for sure that night. I found out where the nearest clay supplier was and it wasn't but 45 minutes away from me. So I made a visit to the supplier to get me some clay and some glazes. Those poor girls in there. I must have asked them a thousand questions that day and I can't remember the first thing I asked them now, except what glazes I needed and what clay was Joanna using? lol. I came home and taught my kids how to make pinch pots, I taught my nieces and nephews how to make pinch pots, and how to glaze the pieces and I had them fired for them. I joined "Club Mud" so I could get my pieces fired at a good price and I went to town.
The thing is... making pinch pots was not what I really wanted to do. I wanted a Potter's Wheel! I had seen one for sale at the suppliers, so I asked about it. It was a Prodigy Wheel. I didn't know much at all about making pottery, much less about a wheel, so I asked them about it. They assured me it was a good wheel. So in April 2010, I put that wheel on layaway. I was so thrilled... "I was finally going to live out a dream of mine". I began to think, "Wow... God certainly DOES care about our dreams!"
At the end of April we were having our 5th Quilting Retreat and I was on the committee. The host of the Retreat told us about a very professional potter who was going to be doing a demonstration for us at the retreat. I was so excited that he was coming. And he did come and do the demo and I asked this poor guy a million questions! I guess I seemed rude taking up all of his time! He had the prettiest Crystalline Pottery I had ever seen in my life... and prettiest I've seen since then!He made all 90 something woman a mug. It's my favorite to drink my coffee out of. It's also my first real mug made from someones hands and not a mold. His name is Phil Morgan and he is a Master Potter. You can see some of his beautiful pieces at Phil Morgan Pottery . I'm sure you will be in awe of his work. I also see he can be found on Facebook. I'll have to friend him :) Seriously though, he really IS the best I've seen yet! So needless to say, that was part of my journey into throwing clay.
I came back from that retreat, so fired up! So excited! I could hardly wait to get my wheel, but I had to wait cause I didn't have the money yet to get it off of layaway. On June 3, 2011 I became the proud owner of a Prodigy Potter's Wheel. While I had been waiting to get my wheel though, I was watching potter's on YouTube throw clay. I watched everything I could of Simon Leach's videos. He became a familiar name around my house. I'd watch him each night I'd go to bed and actually falling asleep many of those nights I watched so long. I have a playlist with every video just about that he has made on Youtube, so I could set it on auto play. He was a big inspiration to me. He sure made it look so easy throwing on the wheel.
I have pics I will post soon from start to where I am now that I will share. I get a few laughs already at myself when I look at some of the pieces. I've come a long way in just less than 3 short months of throwing. I probably had the wheel a week before I decided to throw something. I was so scared to try. The first night I did though, I guess I put too much water on the piece and it went wonky on me. In fact each piece I would try to throw, the rims of the bowls would be thick on one side, and thin on the other. I became frustrated really quick... One reason is I had a husband who stood there and said, "I don't know why it's so hard for you to make something, why you keep ruining the piece"? I got so angry!! I had already swore this was one thing he would NOT get involved in with me. Everything I've done, he's been a part of, but I wanted something for myself only, although the wheel is for a left and right handed person, cause I thought my son might want to throw. So, I got tired of him standing there asking me why I couldn't make something and I said, "Come on... get on this wheel and let me see YOU make something! Come on, show me how easy it is... I promise it's not as easy as you think! And so.... he did! And wonky his piece went and crumbled down! LOL It was so funny. Wish I had a pic of it. I told him, "well, that serves you right for making fun of me". You never learn basic techniques for anything you try to do. And, it's not about how fast you can do something, but how you master the techniques, and how well you perform those techniques. I think that's how you get a good piece of art!
I thought maybe I needed a lesson so I got Joanna to give me a lesson on the wheel. She makes some beautiful hand built pottery pieces herself. I just love her work and she has inspired me greatly. As she watched me on the wheel though, she told me I had the basics down and said, "I just needed to keep practicing".
So, I've been practicing! That's what Simon Leach says as well "Keep on Practicing"! My dream is to take a class from him in PA. I would really love it and I think sometime next year just maybe I'll get to do so.
Well, congratulations if you have read this whole post and you are still with me and not asleep. Sorry so long winded, but that's how it happened.
Stay Tuned for more Post with some pictures of the things I've done so far. And... most of my pieces just look like ceramics for now. I am about to order some dipping glazes... and then... "LET THE FUN BEGIN"!
Thanks yall for reading :)
Saturday, September 3, 2011
First High Fire Glaze Kiln Opening
Hey Yall-
What a fun time my family and I had opening up the kiln and taking the pots out. I had invited my mom and dad to come and my mom invited my aunt to come watch. I was going to edit out alot of the talking, ooo's and ahh's but I wouldn't have been able to show some of my pots.
All of the glazes you see on my ware were created using Laguna glazes cone 5. I think for my first time, they turned out great! I'm going to start doing some test strips shortly so I can see how they look. Maybe I will do a one time firing to see how that looks as well :)
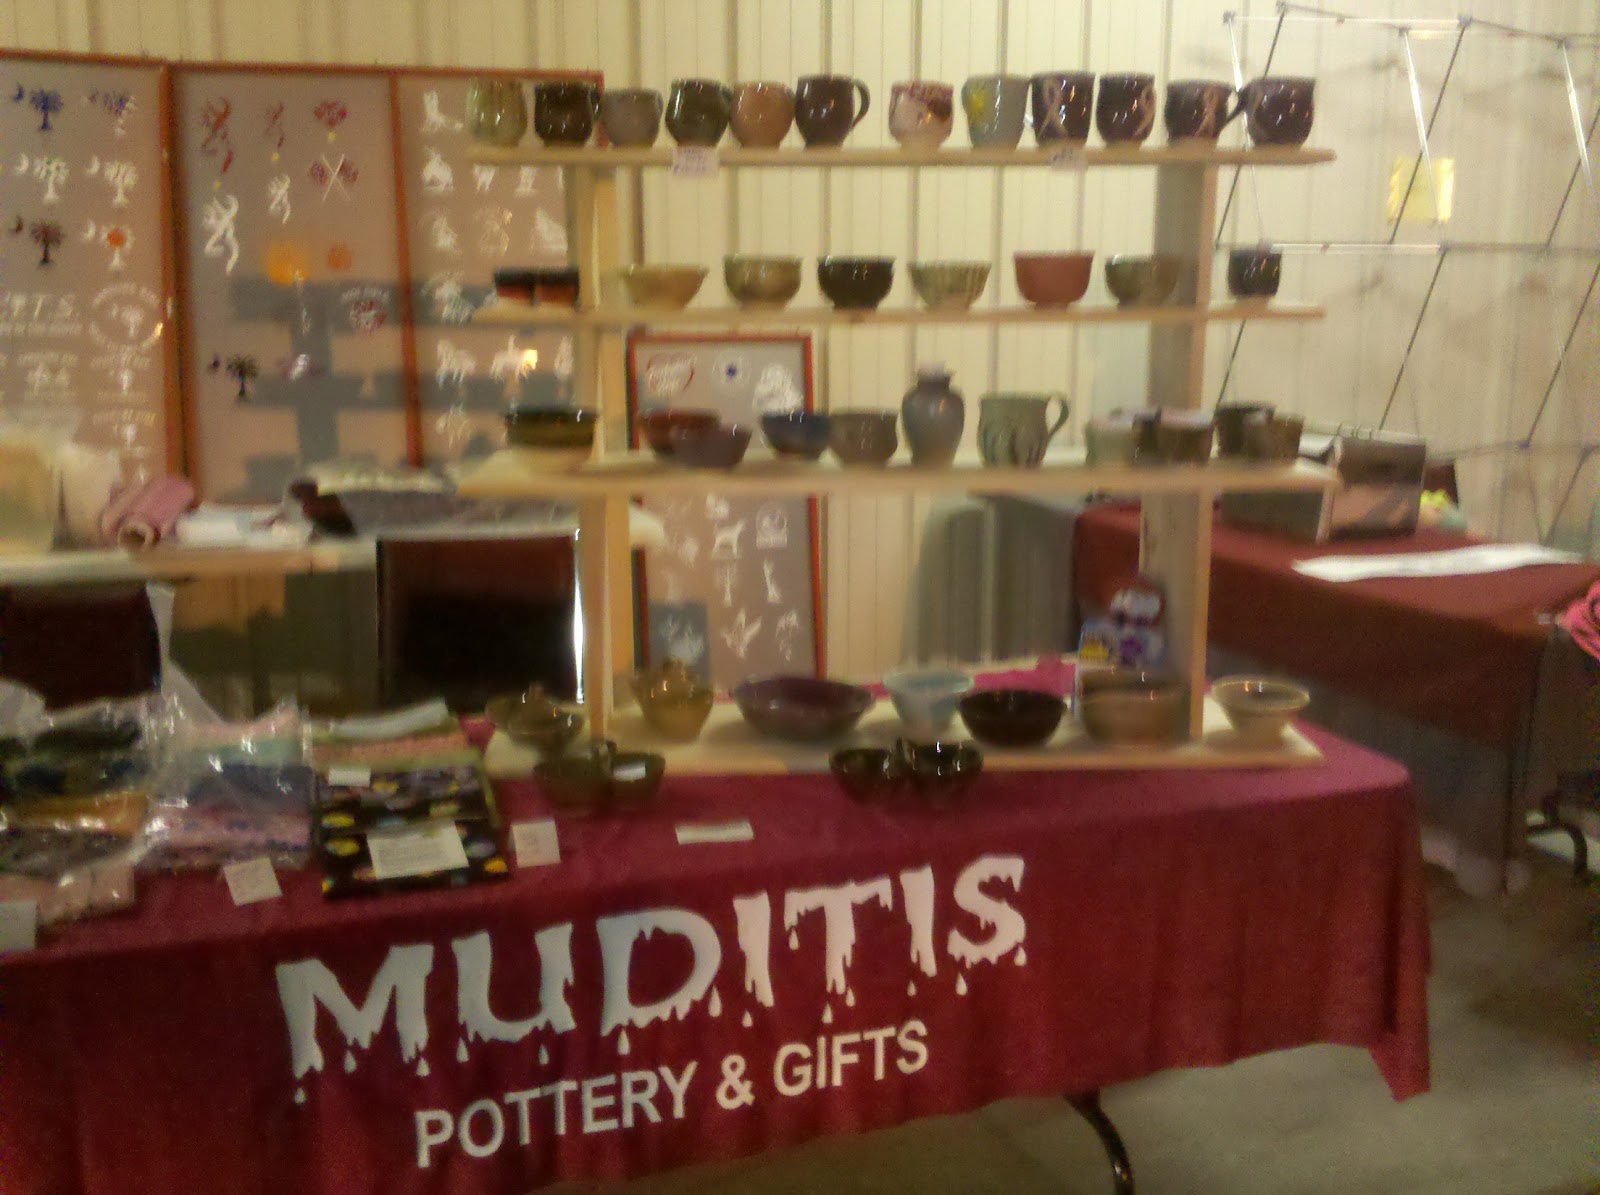
You'd never know in this video that I am running late for a show we were doing. My kiln wasn't ready to open until about 1 1/2 hours before the show, so I didn't really know if I had something to sell or not. Luckily I did, and I was so blessed to make a few sales while I was there. Here are some pics of the booth and my pottery. We also had our Infinity Signs business setup in order to make decals.


If you care to see more of the pots which came from this kiln load, please friend me on facebook. You can find me listed as Muditis Potteryandgifts.
Thanks for stopping by!
Subscribe to:
Posts (Atom)